Question 10
Make the paper craft as per the given instructions. Then, unfold and open the paper fully. Draw lines on the creases made and measure the angles formed.
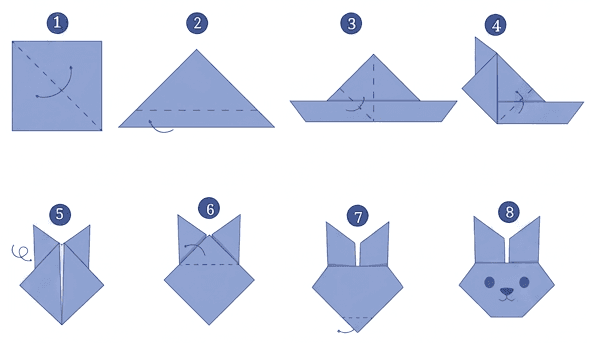
- Folding a square sheet of paper to create an origami rabbit face creates a geometric pattern of crease lines.
- When the paper is unfolded, these creases represent intersecting lines.
- By drawing over these creases, we can identify and measure geometric angles such as right angles (), angles, and other acute angles ().
Step 1 · Fold the Origami Rabbit Face
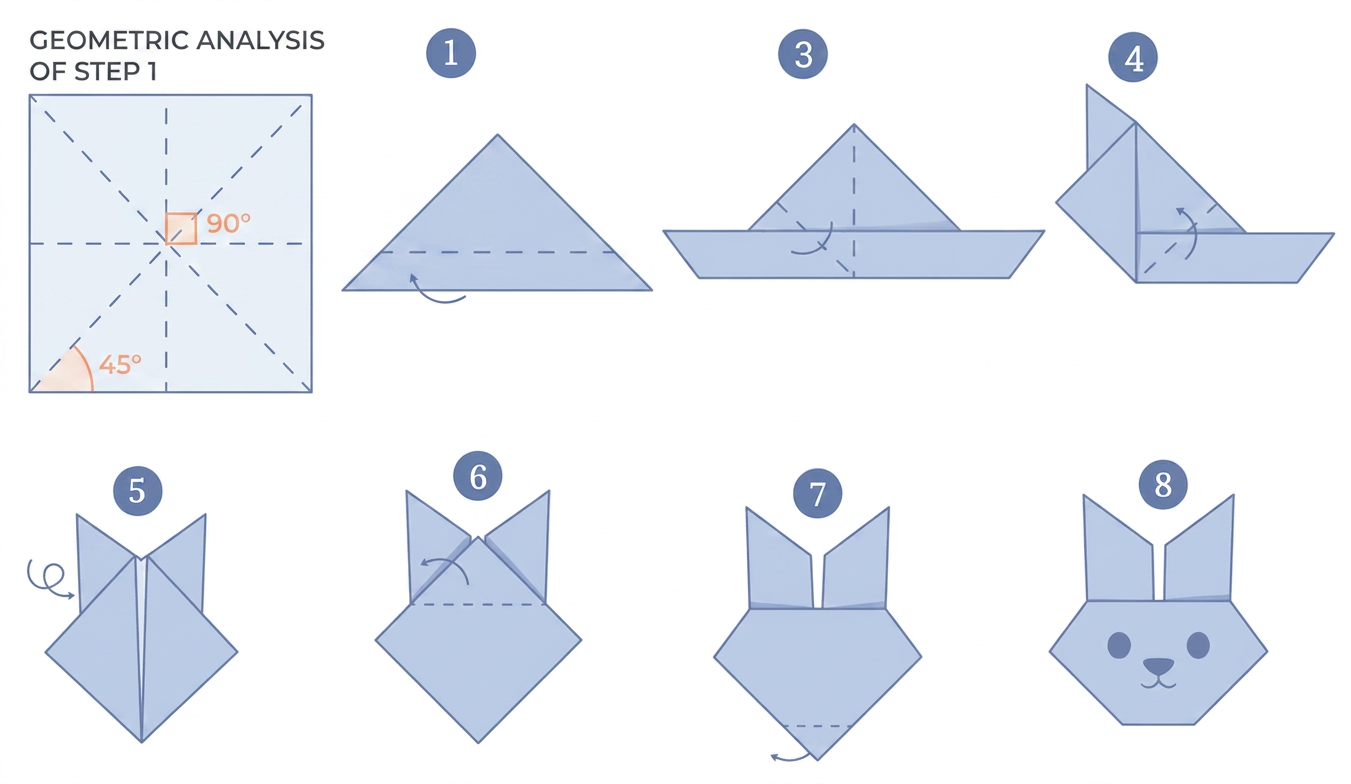
Follow the step-by-step folding process:
- Fold the square paper along one diagonal to make a large triangle.
- Fold the large triangle in half by bringing the two bottom corners together.
- Fold the bottom edge of the top layer upwards and fold the two bottom corners outwards.
- Fold the left and right corners upwards and inwards to form the rabbit's ears.
- Turn the paper around so the ears point upwards.
- Fold the top point downwards to form the head.
- Fold the bottom point upwards to form the chin.
- Draw the rabbit's facial features.
Step 2 · Unfold the Paper and Identify Crease Lines
Carefully unfold the paper completely to reveal the crease pattern.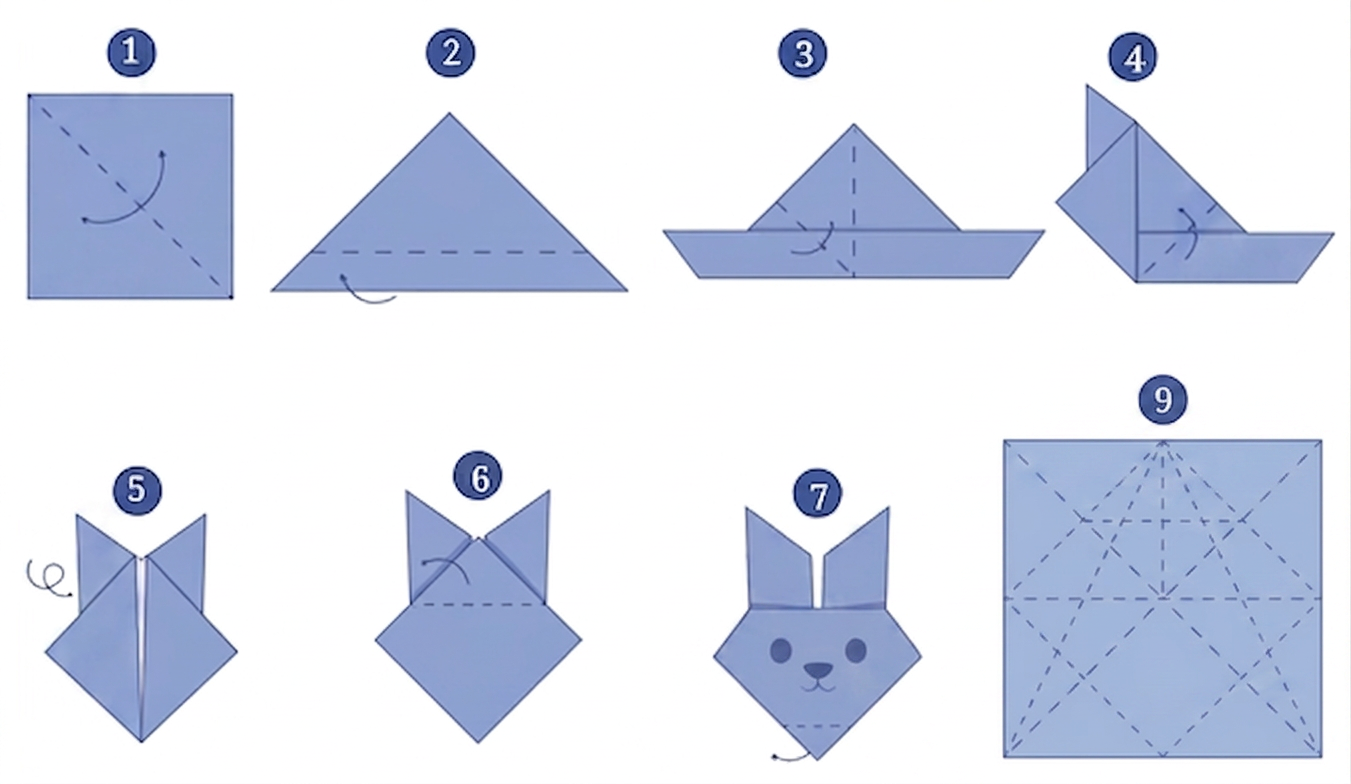
The main creases formed are:
- Two main diagonal lines: Extend corner-to-corner and intersect at the center.
- Three horizontal lines: Across the middle, near the top (ears fold), and near the bottom (chin fold).
- Four smaller diagonal lines: Formed by the ear and corner folds.
Step 3 · Measure the Angles Formed
Examine the angles formed where the crease lines intersect:
- Main diagonal creases: Intersect perpendicularly at the center to form four right angles. Each diagonal also makes a angle with the boundary edges of the square.
- Horizontal creases: Parallel to each other and perpendicular () to the vertical line of symmetry.
- Smaller diagonal creases: Form various acute angles () with adjacent crease lines and the sides of the paper.
Unfolding the paper reveals crease lines forming right angles, angles, and various acute angles ().
- Imprecise Folding: Inaccurate folds will cause the creases not to align correctly, leading to non-standard angle measurements instead of exact and angles.
- Confusing Angle Types: Misclassifying angles (formed between a diagonal and a side) as right angles ().
More questions in A
Fold a piece of paper and unfold it. Do you see a crease?
Mark any two points and on a sheet of paper. Try to connect to by various routes (Fig. 2.1). What is the shortest route from to ?
2.7 Making Rotating Arms
Make several 'rotating arms' with different angles between the arms. Arrange the angles you have made from smallest to largest by comparing and using superimposition.
Now, shuffle and mix up all the rotating arms. Can you identify which of the rotating arms will pass through the slit?
Let's Explore
We can try to solve this problem using a piece of paper. Recall that when a fold is made, it creates a crease which is straight.
Take a rectangular piece of paper and on one of its sides, mark the straight angle AOB. By folding, try to get a line (crease) passing through O that divides into two equal angles.
How can it be done?
Fold the paper such that OB overlaps with OA. Observe the crease and the two angles formed.
Fold the semi-circular sheet in half as shown in Fig. 2.15 to form a quarter circle.
Fold the sheet again as shown in Figs. 2.16 and 2.17:
When folded, this is of the circle, or of a turn, or of , or of or of = ________.
The new creases formed give us measures of and as shown. Write and at the correct places on the new creases along the edge of the semicircle.
Continuing with another half fold as shown in Fig. 2.18, we get an angle of measure ________
Unfold and mark the creases as , , , etc., as shown in Fig. 2.19 and Fig. 2.20.
Make the paper craft as per the given instructions. Then, unfold and open the paper fully. Draw lines on the creases made and measure the angles formed.
Mind the Mistake, Mend the Mistake!
A student used a protractor to measure the angles as shown below. In each figure, identify the incorrect usage(s) of the protractor and discuss how the reading could have been made and think how it can be corrected.
Let's Play a Game #1
This is an angle guessing game! Play this game with your classmates by making two teams, Team 1 and Team 2. Here are the instructions and rules for the game:
- Team 1 secretly choose an angle measure, for example, and makes an angle with that measure using a protractor without Team 2 being able to see it.
- Team 2 now gets to look at the angle. They have to quickly discuss and guess the number of degrees in the angle (without using a protractor!).
- Team 1 now demonstrates the true measure of the angle with a protractor.
- Team 2 scores the number of points that is the absolute difference in degrees between their guess and the correct measure. For example, if Team 2 guesses , then they score points ().
- Each team gets five turns. The winner is the team with the lowest score!
Let's Play a Game #2
We now change the rules of the game a bit. Play this game with your classmates by again making two teams, Team 1 and Team 2. Here are the instructions and rules:
- Team 1 announces to all, an angle measure, e.g., .
- A player from Team 2 must draw that angle on the board without using a protractor. Other members of Team 2 can help the player by speaking words like ‘Make it bigger!’ or ‘Make it smaller!’.
- A player from Team 1 measures the angle with a protractor for all to see.
- Team 2 scores the number of points that is the absolute difference in degrees between Team 2’s angle size and the intended angle size. For example, if player’s angle from Team 2 is measured to be , then Team 2 scores 9 points ().
- Each team gets five turns. The winner is again the team with the lowest score.